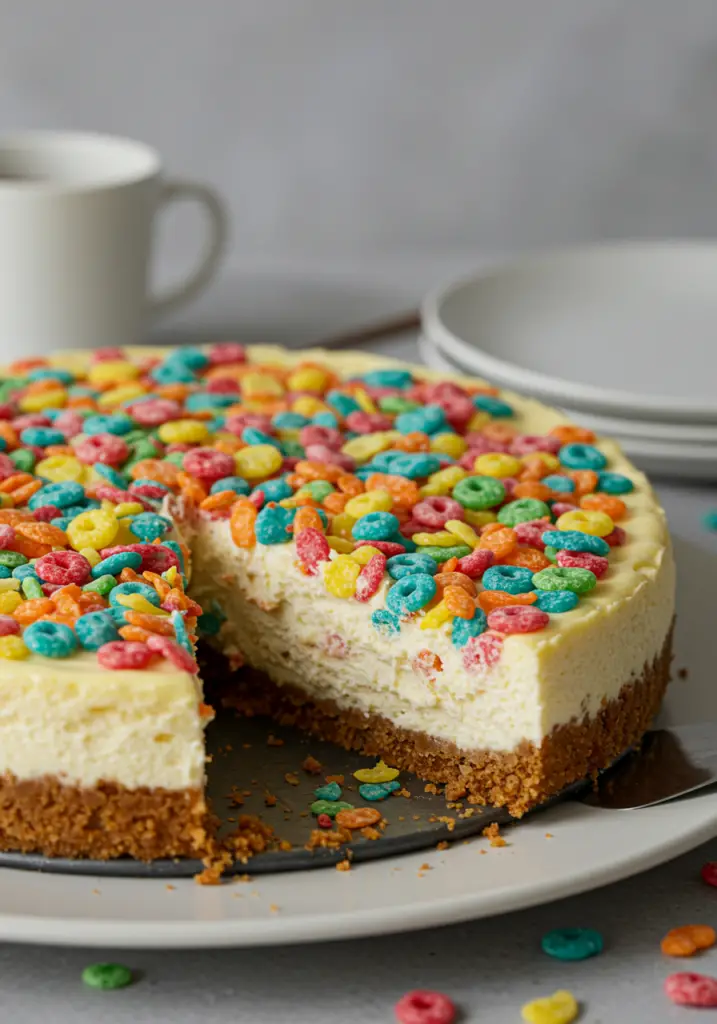
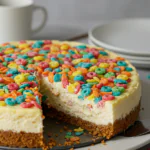
If you’re looking for a no-bake dessert that’s bursting with color, fun, and fruity flavor, this No-Bake Fruity Pebbles Cheesecake is your new go-to recipe. With a crispy, buttery Fruity Pebbles crust and a light, creamy cheesecake filling packed with more cereal goodness, it’s the perfect treat for parties, birthdays, or anytime you’re craving something sweet without turning on the oven.
Want more no-bake desserts that wow? Subscribe now and get new recipes delivered straight to your inbox.
Why You’ll Love This Recipe
No Oven Required – Perfect for warm days or when you just want to keep things simple.
Bright & Colorful – Fruity Pebbles give it a rainbow flair that kids and adults love.
Fun & Nostalgic – A childhood favorite cereal turned into a grown-up treat.
Great for Make-Ahead – Prepares in minutes and chills while you handle everything else.
Creamy & Crunchy – Perfect texture contrast in every bite.
Ingredients You’ll Need
For the Crust:
- 3 cups Fruity Pebbles cereal
- 5 tbsp unsalted butter, melted
- 1½ tbsp granulated sugar
For the Cheesecake Filling:
- 16 oz cream cheese, softened
- ½ cup powdered sugar
- 1 tsp vanilla extract
- 1½ cups heavy whipping cream, cold
- 1 cup Fruity Pebbles cereal
For Topping (Optional):
- ¼ cup Fruity Pebbles cereal
- Whipped cream
- Sprinkles or maraschino cherries
Tools You’ll Need
9-inch springform pan
Mixing bowls
Hand mixer or stand mixer
Spatula
Measuring cups and spoons
Plastic wrap or foil
Step-by-Step Instructions
Step 1: Make the Fruity Pebbles Crust
In a large bowl, mix the Fruity Pebbles cereal with granulated sugar.
Pour in the melted butter and stir until all cereal is coated.
Press the mixture evenly into the bottom of a 9-inch springform pan to form the crust.
Freeze for 10–15 minutes while you prepare the filling.
Step 2: Whip the Cream
Using a chilled bowl, beat the cold heavy whipping cream with a hand or stand mixer until stiff peaks form.
Set aside in the fridge while you prepare the rest of the cheesecake base.
Step 3: Prepare the Cheesecake Base
In another large bowl, beat the softened cream cheese, powdered sugar, and vanilla extract until smooth and creamy.
Make sure there are no lumps.
Step 4: Combine and Fold
Gently fold the whipped cream into the cream cheese mixture using a spatula.
Take your time to keep the texture light and fluffy.
Once combined, gently fold in 1 cup of Fruity Pebbles cereal until evenly distributed.
Step 5: Assemble the Cheesecake
Remove the crust from the freezer and pour the cheesecake mixture over the crust.
Spread evenly and smooth the top with a spatula.
Sprinkle additional Fruity Pebbles cereal on top for decoration.
Cover with plastic wrap and refrigerate for at least 6 hours, or overnight.
Step 6: Serve & Decorate
Once the cheesecake has set, remove the sides of the springform pan.
Top with whipped cream swirls, extra Fruity Pebbles, sprinkles, or cherries for a festive finish.
Slice and serve chilled.
Tips for the Perfect Fruity Pebbles Cheesecake
Use Fresh Cereal – For the best crunch and flavor.
Chill Long Enough – At least 6 hours for a firm, sliceable texture.
Don’t Overmix – Gently fold the whipped cream to keep it light and airy.
Press the Crust Firmly – This helps it hold together when slicing.
Decorate Just Before Serving – Toppings stay crisp and fresh this way.
Serving Suggestions
Perfect as a birthday cake alternative or party centerpiece.
Serve with a glass of cold milk, fruit punch, or vanilla milkshake.
Try cutting into bars for a colorful dessert tray at potlucks or bake sales.
Great for kids’ parties, brunch tables, or as a weekend baking project.
How to Store & Freeze
Storing:
Refrigerate: Store covered in the fridge for up to 4 days.
Keep airtight to prevent the cereal from going soft.
Freezing:
Freeze whole or sliced (wrapped tightly) for up to 1 month.
Thaw in the fridge overnight before serving.
Make-Ahead Tips
Prepare the entire cheesecake a day in advance and store in the fridge.
Add toppings just before serving to keep them crunchy.
You can also prep the crust ahead and store it in the freezer for quick assembly later.
Frequently Asked Questions
1. Can I use marshmallows in the crust instead of butter?
Yes! Melt 4 cups of mini marshmallows with 2 tbsp butter and mix with 3 cups of cereal for a crispy rice-style base.
2. Can I substitute whipped topping?
Absolutely. You can replace the whipped cream with 2 cups of whipped topping (like Cool Whip) for an easier shortcut.
3. Can I make this gluten-free?
Yes! Fruity Pebbles are gluten-free, but always check the label to be sure.
4. What can I use if I don’t have a springform pan?
A deep pie dish or square 8×8 pan lined with parchment will also work well.
5. Can I use other cereals?
Definitely! Cocoa Pebbles, Rice Krispies, or even Cap’n Crunch are fun alternatives.
Final Thoughts
This No-Bake Fruity Pebbles Cheesecake is the kind of dessert that brings out your inner child. It’s colorful, creamy, and loaded with nostalgic flavor – all without needing to bake a thing. Whether you’re serving it for a birthday, brunch, or just because you feel like treating yourself, this cheesecake delivers on fun and flavor every time.
Make it, chill it, and get ready for a dessert that steals the show. Don’t forget to leave a review and share your creation with us – we’d love to see your colorful masterpieces!
Preparation Time: 20 minutes
Chilling Time: 6 hours
Cuisine: American
Nutritional Information (Per Slice, Serves 10):
Calories: 400 | Protein: 6g | Carbohydrates: 32g | Fat: 28g | Fiber: 1g | Sodium: 190mg
No-Bake Fruity Pebbles Cheesecake
- Total Time: 20 minutes
Description
If you’re looking for a no-bake dessert that’s bursting with color, fun, and fruity flavor, this No-Bake Fruity Pebbles Cheesecake is your new go-to recipe. With a crispy, buttery Fruity Pebbles crust and a light, creamy cheesecake filling packed with more cereal goodness, it’s the perfect treat for parties, birthdays, or anytime you’re craving something sweet without turning on the oven.
Want more no-bake desserts that wow? Subscribe now and get new recipes delivered straight to your inbox.
Ingredients
For the Crust:
-
3 cups Fruity Pebbles cereal
-
5 tbsp unsalted butter, melted
-
1½ tbsp granulated sugar
For the Cheesecake Filling:
-
16 oz cream cheese, softened
-
½ cup powdered sugar
-
1 tsp vanilla extract
-
1½ cups heavy whipping cream, cold
-
1 cup Fruity Pebbles cereal
For Topping (Optional):
-
¼ cup Fruity Pebbles cereal
-
Whipped cream
-
Sprinkles or maraschino cherries
Instructions
Step 1: Make the Fruity Pebbles Crust
In a large bowl, mix the Fruity Pebbles cereal with granulated sugar.
Pour in the melted butter and stir until all cereal is coated.
Press the mixture evenly into the bottom of a 9-inch springform pan to form the crust.
Freeze for 10–15 minutes while you prepare the filling.
Step 2: Whip the Cream
Using a chilled bowl, beat the cold heavy whipping cream with a hand or stand mixer until stiff peaks form.
Set aside in the fridge while you prepare the rest of the cheesecake base.
Step 3: Prepare the Cheesecake Base
In another large bowl, beat the softened cream cheese, powdered sugar, and vanilla extract until smooth and creamy.
Make sure there are no lumps.
Step 4: Combine and Fold
Gently fold the whipped cream into the cream cheese mixture using a spatula.
Take your time to keep the texture light and fluffy.
Once combined, gently fold in 1 cup of Fruity Pebbles cereal until evenly distributed.
Step 5: Assemble the Cheesecake
Remove the crust from the freezer and pour the cheesecake mixture over the crust.
Spread evenly and smooth the top with a spatula.
Sprinkle additional Fruity Pebbles cereal on top for decoration.
Cover with plastic wrap and refrigerate for at least 6 hours, or overnight.
Step 6: Serve & Decorate
Once the cheesecake has set, remove the sides of the springform pan.
Top with whipped cream swirls, extra Fruity Pebbles, sprinkles, or cherries for a festive finish.
Slice and serve chilled.
Notes
Use Fresh Cereal – For the best crunch and flavor.
Chill Long Enough – At least 6 hours for a firm, sliceable texture.
Don’t Overmix – Gently fold the whipped cream to keep it light and airy.
Press the Crust Firmly – This helps it hold together when slicing.
Decorate Just Before Serving – Toppings stay crisp and fresh this way.
- Prep Time: 20 minutes
- Cuisine: American