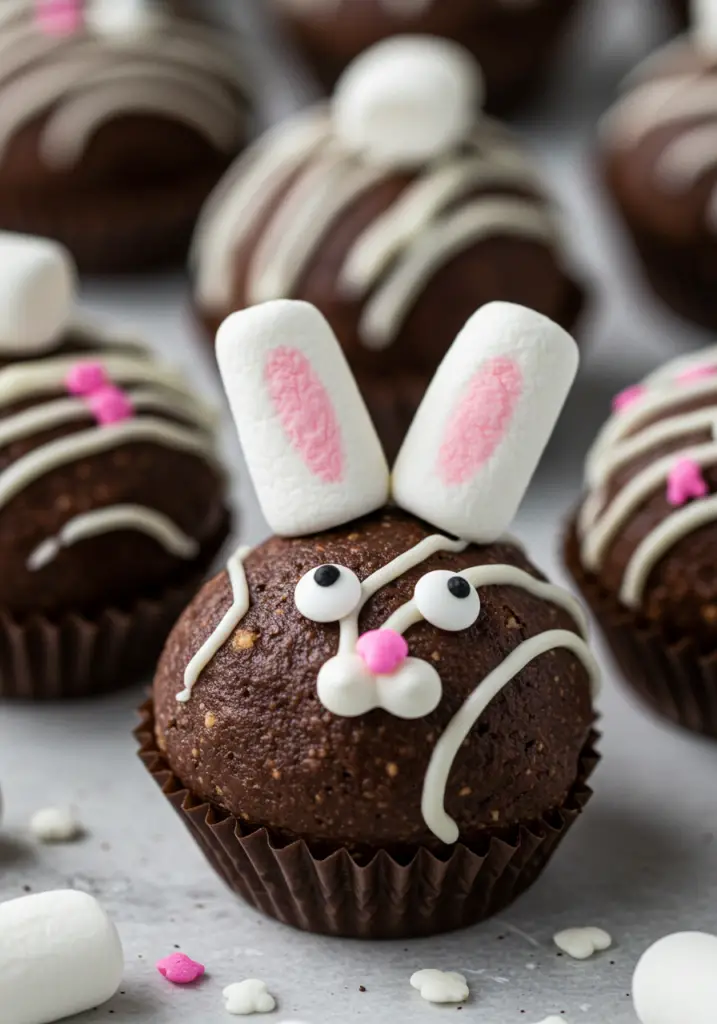
Looking for a fun, festive treat to celebrate the season? These Bunny Butt Oreo Balls are a playful and delicious way to indulge your sweet tooth! Made with crushed Oreos and creamy filling, these no-bake truffles are shaped into adorable bunny butts, complete with little white tails and paw prints. They’re perfect for Easter parties, spring gatherings, or as a sweet gift for loved ones!
Why You’ll Love This Recipe:
- Adorably Festive: These bunny butt Oreo balls are almost too cute to eat!
- No-Bake Ease: Quick and simple — no oven required.
- Chocolatey Oreo Delight: Crushed Oreos and creamy filling coated in rich chocolate — pure dessert bliss.
- Family-Friendly Fun: A playful, tasty treat everyone will enjoy making and munching on!
Ingredients You’ll Need:
- Oreo Cookies (1 package, about 36 cookies) – The base of the truffles.
- Cream Cheese (8 oz, softened) – Adds creaminess to the filling.
- White Chocolate Chips (1 ½ cups) – For the outer coating.
- Milk Chocolate Chips (1/4 cup) – For the little bunny paw prints.
- Mini Marshmallows (8-10) – For the bunny tails.
- Candy Eyes (optional) – To give your bunny balls a cute expression.
- Pink Sprinkles (optional, for added decoration) – For extra flair.
Tools You’ll Need:
- Food processor (or rolling pin and zip-top bag for crushing Oreos)
- Mixing bowl
- Microwave-safe bowl (for melting chocolate)
- Baking sheet
- Parchment paper
- Spoon or small scoop
- Toothpicks (for shaping)
- Small piping bag or Ziploc bag (for melted chocolate)
How to Make Bunny Butt Oreo Balls:
Step 1: Prepare the Oreo Filling
Crush the Oreo cookies into fine crumbs. You can use a food processor or place them in a zip-top bag and crush them with a rolling pin. In a large bowl, mix the crushed Oreos with softened cream cheese until well combined. The mixture should be thick and sticky.
Step 2: Form the Oreo Balls
Using your hands or a small scoop, roll the Oreo mixture into 12-15 small balls. Then, slightly flatten each ball into an oval shape to form the bunny “butts.”
Step 3: Chill the Oreo Balls
Place the shaped Oreo balls on a baking sheet lined with parchment paper and refrigerate for about 30 minutes to firm up.
Step 4: Melt the White Chocolate
In a microwave-safe bowl, melt the white chocolate chips in 20-30 second intervals, stirring between each, until smooth and fully melted.
Step 5: Coat the Oreo Balls
Dip each Oreo ball into the melted white chocolate, using a spoon to help coat them completely. Let any excess chocolate drip off before placing the balls back onto the parchment paper.
Step 6: Make the Bunny Tails
While the white chocolate coating is still soft, place a mini marshmallow at the top of each ball to create the “bunny tail.”
Step 7: Create the Bunny Paws
Melt the milk chocolate chips in the microwave as well, then use a small piping bag or a Ziploc bag with the tip cut off to pipe small paw prints on the bottom of each ball. You can create 2-3 little paw prints to complete the look of the bunny butt!
Step 8: Add Finishing Touches
If desired, add candy eyes and pink sprinkles for extra decoration. You can also pipe a little pink frosting for the bunny’s nose.
Step 9: Chill Again
Refrigerate the bunny butt Oreo balls for another 30 minutes to set the chocolate coating completely.
What to Serve with This Dish:
- Milk – These Oreo balls go perfectly with a glass of milk.
- Fruit – Serve alongside fresh fruit for a balanced sweet treat.
- Easter-themed Desserts – Pair with other Easter treats like cupcakes or carrot cake.
Tips for the Best Bunny Butt Oreo Balls:
- Let the Oreo balls chill – This helps them firm up so they’re easier to dip and decorate.
- Melt the chocolate carefully – Use short intervals in the microwave to avoid burning the chocolate.
- Customize the design – Use different colored sprinkles or candies to add a personal touch to your bunny butts.
- Keep them chilled – Store the Oreo balls in the fridge to keep them fresh and maintain their shape.
Storing & Reheating:
- Refrigerate: Store in an airtight container for up to 5 days.
- Freeze: These Oreo balls freeze well! Freeze them in a single layer on a baking sheet, then transfer to a freezer bag for up to 1 month. Let them thaw at room temperature before serving.
FAQs:
- Can I use dark chocolate instead of white chocolate? Yes, you can use dark or milk chocolate for the coating if you prefer.
- Can I use regular marshmallows instead of mini ones? Yes, you can cut regular marshmallows into small pieces to create the bunny tails.
- Can I add other fillings? Feel free to mix in crushed nuts, sprinkles, or other add-ins to customize the filling.
Conclusion:
These Bunny Butt Oreo Balls are not only cute but delicious too! They’re the perfect no-bake treat for Easter, springtime, or any occasion that calls for a fun and sweet dessert. With a creamy Oreo center, crispy white chocolate coating, and adorable bunny features, these little bites are sure to bring smiles to everyone’s face!
Preparation Time: 20 minutes
Chilling Time: 1 hour
Cuisine: American
Nutritional Information (Per Serving, 1 ball):
Calories: 150 | Protein: 2g | Carbohydrates: 18g | Fat: 8g | Fiber: 1g | Sodium: 50mg

Bunny Butt Oreo Balls
- Total Time: 20 minutes
Description
Looking for a fun, festive treat to celebrate the season? These Bunny Butt Oreo Balls are a playful and delicious way to indulge your sweet tooth! Made with crushed Oreos and creamy filling, these no-bake truffles are shaped into adorable bunny butts, complete with little white tails and paw prints. They’re perfect for Easter parties, spring gatherings, or as a sweet gift for loved ones!
Subscribe to our newsletter to get this recipe delivered straight to your inbox and never miss out on delicious updates.
Ingredients
- Oreo Cookies (1 package, about 36 cookies) – The base of the truffles.
- Cream Cheese (8 oz, softened) – Adds creaminess to the filling.
- White Chocolate Chips (1 ½ cups) – For the outer coating.
- Milk Chocolate Chips (1/4 cup) – For the little bunny paw prints.
- Mini Marshmallows (8-10) – For the bunny tails.
- Candy Eyes (optional) – To give your bunny balls a cute expression.
- Pink Sprinkles (optional, for added decoration) – For extra flair.
Instructions
Step 1: Prepare the Oreo Filling
Crush the Oreo cookies into fine crumbs. You can use a food processor or place them in a zip-top bag and crush them with a rolling pin. In a large bowl, mix the crushed Oreos with softened cream cheese until well combined. The mixture should be thick and sticky.
Step 2: Form the Oreo Balls
Using your hands or a small scoop, roll the Oreo mixture into 12-15 small balls. Then, slightly flatten each ball into an oval shape to form the bunny “butts.”
Step 3: Chill the Oreo Balls
Place the shaped Oreo balls on a baking sheet lined with parchment paper and refrigerate for about 30 minutes to firm up.
Step 4: Melt the White Chocolate
In a microwave-safe bowl, melt the white chocolate chips in 20-30 second intervals, stirring between each, until smooth and fully melted.
Step 5: Coat the Oreo Balls
Dip each Oreo ball into the melted white chocolate, using a spoon to help coat them completely. Let any excess chocolate drip off before placing the balls back onto the parchment paper.
Step 6: Make the Bunny Tails
While the white chocolate coating is still soft, place a mini marshmallow at the top of each ball to create the “bunny tail.”
Step 7: Create the Bunny Paws
Melt the milk chocolate chips in the microwave as well, then use a small piping bag or a Ziploc bag with the tip cut off to pipe small paw prints on the bottom of each ball. You can create 2-3 little paw prints to complete the look of the bunny butt!
Step 8: Add Finishing Touches
If desired, add candy eyes and pink sprinkles for extra decoration. You can also pipe a little pink frosting for the bunny’s nose.
Step 9: Chill Again
Refrigerate the bunny butt Oreo balls for another 30 minutes to set the chocolate coating completely.
Notes
- Let the Oreo balls chill – This helps them firm up so they’re easier to dip and decorate.
- Melt the chocolate carefully – Use short intervals in the microwave to avoid burning the chocolate.
- Customize the design – Use different colored sprinkles or candies to add a personal touch to your bunny butts.
- Keep them chilled – Store the Oreo balls in the fridge to keep them fresh and maintain their shape.
- Prep Time: 20 minutes
- Cuisine: American